With increasing programs and other data on your system, it starts showing symptoms of malperformance. Though the existence of this data directly doesn’t make any change to your system functionality overtime when your system accumulates GBs of this data then it makes your system run slow. In addition to that, there are other reasons (like malware) as well that affects your system performance negatively. In this article, we have discussed ways to make your Windows 10 PC boot faster.
Enable Fast Boot Option: Fast boot option comes built-in on your Windows 10 system that helps you speed up your system boot time. This feature is designed to offer you an advanced alternative to boot your system for better speed and performance. When you enable this option on your PC, it will save or store an image of the loaded kernel and drivers on your system in a file called “hiberfil.sys”. During the process, it will avert dumping this information in your PC RAM. While talking technically, hiberfil.sys file helps you store the current state of your Windows system. Now when this feature is enabled on your system, your PC will reload hiberfil.sys file whenever you boot your PC. It will help you speed up boot time instantly on your system.
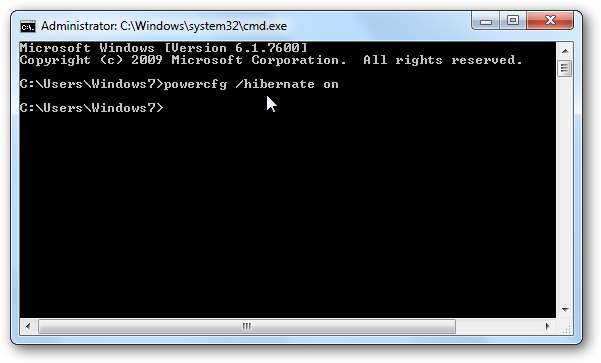
In case you are not able to view Fast Boot option then probably you don’t have hibernation enabled on your system. Here, you need to enable hibernation mode on your PC before you enable “Turn on fast startup” option. To do this, search “cmd” in the search box on the taskbar and select Command Prompt. Now on Command Prompt window, type “powercfg /hibernate on” and press enter to activate hibernation.
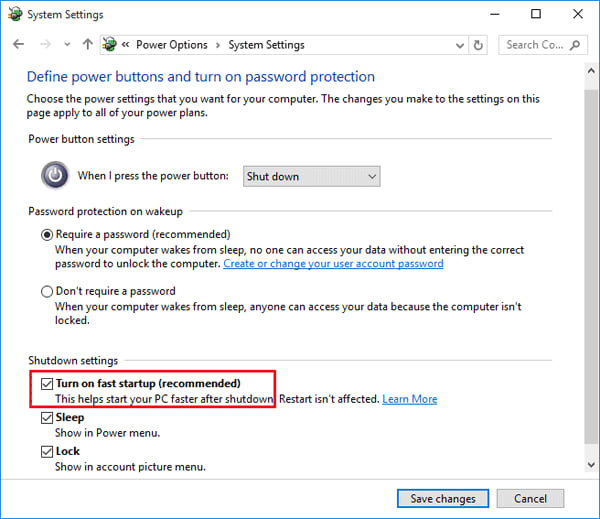
Now return to power user menu on your system. Here, head to Control Panel > System and Security > Power Options > Choose what the power button does > Change settings that are currently unavailable. Now go to Shutdown settings and enable “Turn on fast startup” option. This is one of the most effective ways to make your Windows 10 PC boot faster.
Adjust Virtual Memory Settings: Virtual Memory works as a temporary RAM for your system. While running programs & files on your system if your system RAM gets full it transfers idle data on your system hard disk (virtual memory or paging file) for short span of time. It is useful to keep your system running well and improve file load time. In short when your system finds more RAM space to run the files, it will help boost your system performance. Further, you can make necessary changes in virtual memory space to speed up your system performance and boot time. To adjust virtual memory, follow below-mentioned steps.
- Search “performance” in the search box on the taskbar and select “Adjust the appearance and performance of Windows” option.
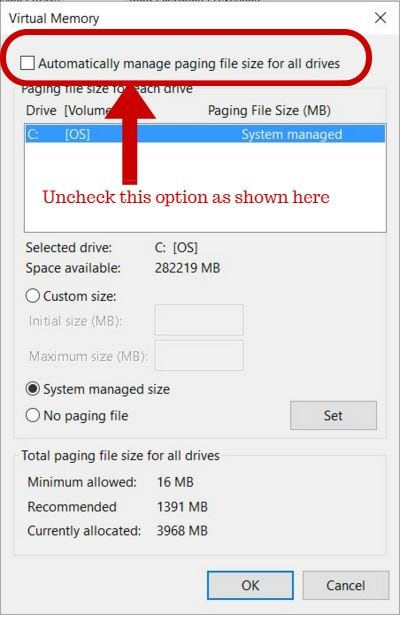
- Here, select the Advanced tab and go to paging file size to make necessary changes. To do this, tap on Change button to edit it. Before that Uncheck “Automatically manage paging file size for all drives” to make changes.
- Here, select the Custom Size and make changes in Initial Size and Maximum Size to the recommended value below.
- Once you are done, restart your PC so that changes can take place.
Manage Startup Items: Your system loads a lot of programs & files when it boots at first. These startup items are loaded to improve your user experience and to enable you to access different features & services of your PC. While most of these startup items remain useful to you, still there include certain unnecessary items from bloatware and other unnecessary programs that make your boot process slow. To deal with this issue, you can make necessary changes in startup items that load at boot time. To manage or disable unnecessary startup items, follow below mentioned steps.
- Right-click on taskbar and select Task Manager.
- On Task Manager window, click on “More Details” option in the lower-left corner to see expanded view.
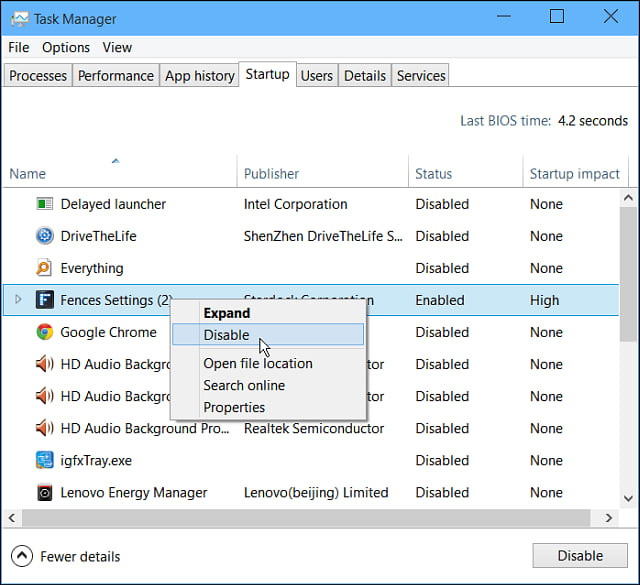
- Tap on Startup tab to see all startup items.
- Now sift through the list to find unnecessary startup items.
- Once you select the unnecessary startup item, right-click on it and select Disable to remove it from the boot process.
- Reboot your PC to make changes take place.
Following this simple process, you can make your boot time faster in addition to making your computer shut down time faster too as your PC would require fewer items to close. In addition to making changes here, you can also visit your system registry to disable or remove unnecessary startup entries. To do this, you can open Registry Editor by searching for “regedit” in the search box on the taskbar. Before you make any changes in the registry, it is important to know how the registry works and what impact it would make if you change any registry entry.
Turn off the New Linux Terminal: The Windows 10 Anniversary update has brought Linux Bash terminal to users for improved user experience. It was especially useful for developers as they have more options available. Despite that, it is said to be creating certain boot issues on your PC. Further, if you don’t know this setting exists on your system then this step isn’t for you.
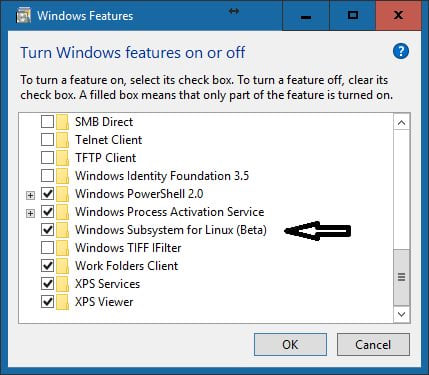
To turn off this setting on your PC, search “features” in the search box on the taskbar and select “Turn Windows features on or off” option. Now sift through the list to find “Windows Subsystem for Linux(Beta)” option, uncheck it and reboot your PC. In case you want Linux terminal later, you can get other tools available online.
Install PC Cleaner Tools: The next best thing we suggest you to boost your system boot process and overall performance is to use pc cleaner tools for Windows 10. These smart tools work on advanced algorithms where it scans even the remotest corners of your system to find and remove all unnecessary files and other data. Further, it helps you streamline your startup items to speed up your system boot process. These tools work automatically to clean all junk from your system and improve your system performance significantly.


